

Table of Content
If you’re looking for in-depth learning on how to customize the Shopify checkout page, then look no further! Today, we're going to walk you through a step-by-step tutorial for enhancing and optimizing the checkout page of your Shopify store.
In the competitive world of e-commerce, maximizing the value of each customer transaction is crucial for sustainable growth. One effective strategy to achieve this is to leverage Shopify's checkout customization power. By optimizing your checkout process and strategically offering additional products or services, you can encourage customers to spend more, ultimately boosting your average order value (AOV).

If you manage a Shopify store, you are aware of how vital the checkout procedure is to your company and customers. In fact, many would argue that the checkout page is the most crucial part of the user experience. Therefore, you're probably losing out on more sales if you aren't optimizing your checkout page.
In this guide, you’ll learn how you can customize your Shopify checkout page, allowing you to boost your conversion rates and average order value.
Our comprehensive guide will explore and guide you through various techniques and tactics you can use to enhance your Shopify checkout experience and increase your AOV.
Let’s begin!
When Can Shopify Checkout Be Customized?
Whether the possibility to customize the checkout page is available to both Shopify Basic and Shopify Plus is a key concern that has to be answered when it comes to Shopify checkout customization.
YES! Both Shopify Basic and Shopify Plus businesses have the option to customize the checkout process. Regardless of the merchant's pricing plan, Shopify offers a number of built-in customization options for checkout pages.

Shopify Basic businesses may use pre-designed checkout templates to choose from, add their store's logo, change the colors and fonts, and build a personalized Shopify checkout experience on their checkout pages.
Shopify Plus merchants have access to more customization options, including the capability to apply custom checkout components to their checkout pages, enabling more complex and thoroughly personalized checkout processes.
In addition to that, Shopify Plus merchants have the option to use third-party apps and integrations along with the built-in features to customize their checkout pages further and add extra functionality. These functionalities can include adding custom fields to the Shopify checkout as well as upselling and cross-selling products on their checkout page.
Why Should You Customize Your Checkout Page?
If you want to add new features, change the layout of your checkout page, or launch exclusive deals for your consumers, Shopify checkout customization is a practical option.
The time and effort invested in customization pays off in a variety of ways for the company. It's a strategy to raise your conversion rate, increase sales and profits, and earn a substantial return on investment. Here are the major justifications for customizing Shopify's checkout page.
Boost Your Conversion Rate
Your conversion rate is immediately increased by customizing your Shopify checkout page, provided that you do it properly. Don’t worry, keep reading through our guide since we will be exploring steps you can take to customize your Shopify checkout in such a way that it enhances conversion rates.
Consistent Brand Experience
A checkout page that isn't consistent with your Shopify store's overall aesthetic will almost certainly harm the user experience. You do not want that! You may customize your checkout to keep it consistent with your brand or improve the design and layout of your checkout page to make it more attractive and user-friendly in order to prevent this from happening. As a consequence, your ability to retain customers will soar.
Increase Your Average Order Value
Another motivation to customize the Shopify checkout page is the potential to boost your average order value. With customization, you may add upselling and cross-selling tools to encourage your consumers to make larger purchases. For instance, you may cross-sell a long skirt to a customer buying a top through your store.
Understanding Average Order Value (AOV)
Before diving into the customizations, it's essential to grasp the concept of average order value, or AOV. AOV represents the average amount of money spent by customers during a single transaction. By increasing this value, you can maximize revenue without acquiring additional customers.

As a Shopify merchant, your goals should primarily include acquiring new customers and making the most of your existing ones. According to research, existing customers are 31% more likely to spend more overall compared to new customers and are 50% more inclined to explore new products or services. They are more willing to try new products and spend more money since they already know and trust your brand.
Therefore, concentrating on satisfying your current customers is just as essential as targeting potential customers to increase sales and encourage people to try out your other products or services. Your store’s checkout page is one of the most crucial elements you can leverage to do so.
Now let’s dive into the types of Shopify checkout page customization options you can undertake for your Shopify store.
Types of Shopify Checkout Page Customizations
Shopify Checkout Customization Using The Theme Editor
You may access this Shopify checkout customization option using your theme editor. This type of editing requires no additional tools and is available in all Shopify pricing tiers, with the exception of Shopify Plus. It allows for simple visual customizations that you can use to create a unified brand experience, such as adding your brand's logo, background color, or image, changing the colors on the checkout page, and changing the font.
Learn All About Shopify Store Development & Theme Customization
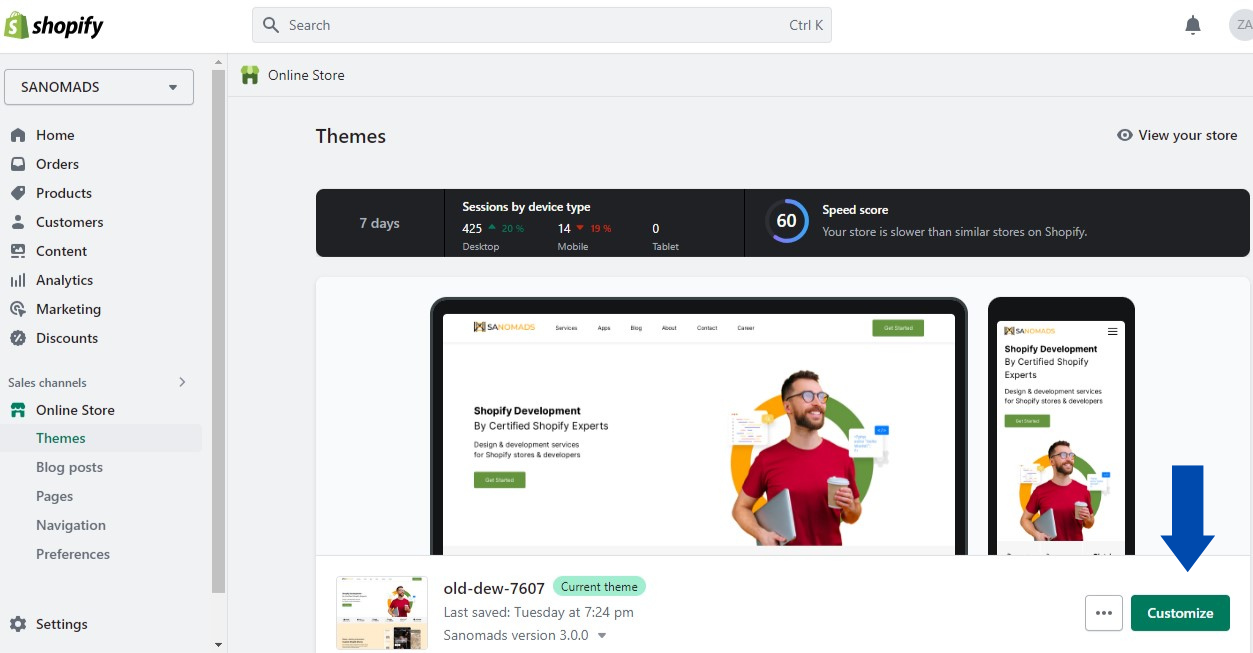
To do so, click "Customize" next to your current theme, then go to "Theme Settings" and "Checkout" on the left to edit the checkout template for your Shopify store.

The following are some potential checkout customizations:
-
Including a banner or other appropriate picture as a header
-
Setting your brand logo’s size and position
-
Changing the colors of the checkout page's sections, buttons, text, and links
-
Enabling guest checkout to prevent cart abandonment
-
Providing multiple payment methods
Shopify Plus Customizations
Shopify Plus merchants have three exclusive options to customize their checkout experience. They can either use the checkout editor, Shopify Checkout Extensibility, or create a one-page checkout. We will explore all options in detail further along in the blog.
Customizing Checkout With Shopify Checkout Extensibility
Launched in the summer of 2022, Shopify Checkout Extensibility is a suite of powerful apps and tools for making code-free customizations to your Shopify Plus Checkout page. These include:
-
Checkout UI extensions
-
Web pixel extensions
-
Shopify Functions
-
Checkout Branding API
With the ability to customize without writing code and the flexibility to create fully personalized experiences, Shopify empowers merchants on Shopify Plus to shape their desired outcomes.
Here are some potential checkout customizations they can undertake:
-
Adding forms to signup for SMS and email marketing
-
Adding a delivery date picker
-
Adding checkout instructional prompts
-
Adding checkout image banners
-
Cross-selling and upselling with personalized product recommendations
-
Creating a fear of missing out
-
Displaying trust badges
-
Displaying shipping security information
-
Post-purchase cross-selling and upselling
Customizing Using The Checkout Editor
The checkout editor is limited to Shopify Plus stores. It provides merchants with the ability to fully customize the branding of their checkout pages, allowing them to create a cohesive and immersive shopping experience that aligns perfectly with their brand identity. This powerful tool gives you complete control over various elements, enabling you to tailor every aspect of the checkout page to match your business aesthetics.
With the checkout editor for Shopify Plus stores, you can:
-
Incorporate your brand's logo for recognition and trust.
-
Choose a resonating background image.
-
Customize colors for consistency.
-
Select a font that complements your brand's style.
-
These changes create an immersive shopping experience that aligns perfectly with your brand identity.
By leveraging the extensive customization options provided by the checkout editor, you can create a checkout experience that not only looks visually appealing but also aligns with your brand's values and enhances customer confidence. The ability to customize the branding of your checkout pages ensures that every step of the customer journey reflects your brand, creating a seamless and memorable shopping experience.
Constructing a One-Page Checkout
A streamlined one-page checkout aims to simplify online purchases, ensuring a seamless and efficient shopping experience.

By consolidating the checkout process, customers can swiftly input their order information on a single page and proceed with the transaction. Instead of navigating through multiple pages for billing, shipping, and payment details, shoppers only need to provide the required information once on a unified page.
We will now discuss how Shopify basic merchants can customize their Shopify checkout using the Theme Editor.
How To Customize Shopify Checkout Using The Theme Editor
Step 1: Add A Background Image
To customize the background image of the banner displayed on each checkout page of your online store, follow these simple steps:
-
Access your Shopify Admin and navigate to the 'Online Store' section.
-
Select 'Themes' and click on the 'Customize' button next to your current theme.
-
Within the theme editor, locate the 'Theme Settings' option and click on it.
-
In the 'Checkout' section, you'll find the 'Banner' subsection.
-
To change the background image, click on the 'Select Image' button.
-
Upload an image with dimensions of 1000 x 400 pixels and then click on the 'Save' button.

By following these steps, you'll be able to easily update the background image of the banner, ensuring that it aligns seamlessly with your brand's aesthetic and enhances the overall visual appeal of your checkout pages.
Step 2: Add Your Logo
To incorporate your company logo into the Shopify checkout page, you can follow these simple steps:
-
Begin by accessing your Shopify Admin panel and navigating to the 'Online Store' section.
-
Select the 'Themes' option and locate the 'Customize' button corresponding to your current theme.
-
Within the theme editor, you will find the 'Theme Settings' tab. Click on it to proceed.
-
Look for the 'Checkout' section in the settings and click on it to access the relevant options.
-
In the 'Logo' subsection, you will see the 'Select Image' button. Click on it to choose and upload your company logo.
-
Upload a logo image.
-
Set the position for the logo.
-
Set the size for the logo.
-
Click 'Save' to save your changes.
By following these steps, you can effortlessly add your unique company logo to the Shopify checkout page. This customization allows you to reinforce your brand identity and create a more cohesive shopping experience for your customers throughout the entire checkout process.
Step 3: Customize The Main Content Area With Background Image Or Color
To maintain a consistent design aesthetic for your online store, you have the flexibility to modify the main content area's color or background image on the Shopify checkout page. This section is where customers provide their shipping and payment information, so it's essential to ensure that your design choices do not compromise readability. Follow these steps to make these adjustments:
-
Access your Shopify Admin and navigate to the "Online Store" section, then select "Themes."
-
Look for the "Customize" button associated with your current theme and click on it.
-
In the theme editor, locate and select "Theme Settings," then proceed to the "Checkout" section.
-
Within the "Main Content Area" section, you can choose to add a background image by selecting the "Select Image" button or adjust the background color using the provided color picker. Remember that you can customize either the background image or color, but not both simultaneously.
-
Once you have made the desired changes, ensure to save your modifications by clicking the "Save" button.

By personalizing the background image or color of the main content area, you can create a cohesive visual experience that aligns with your online store's overall branding. Just remember to prioritize readability to ensure a seamless and user-friendly checkout process.
Step 4: Change The Color Of Form Fields
To change the color of the form fields on your Shopify checkout page, follow these steps:
-
Go to your Shopify admin and select Online Store > Themes.
-
Click Customize next to your current theme.
-
In the Theme Settings editor, go to the Checkout section.
-
In the Main Content Area section, click the Form Fields drop-down and select a color. You can choose between white or transparent.
-
Click Save.

Here are some additional tips for changing the color of the form fields:
-
If you choose the Transparent option, the text in the form fields will only be visible when the user hovers over them.
-
If you are using a third-party theme, you may need to contact the theme developer for instructions on how to change the color of the form fields.
Step 5: Customize Order Summary With Background Image Or Color
To add a background image or color to the order summary on your Shopify checkout page, follow these steps:
-
Go to your Shopify admin and select Online Store > Themes.
-
Click Customize next to your current theme.
-
In the Theme Settings editor, go to the Checkout section.
In the Order Summary section, you can either:
-
Click the Add Background Image button to add a background image.
-
Click the Change Background Color button to open a color picker and select a background color.
-
Click Save.

Note: You can only change the background image or color, not both.
Here are some additional tips for adding a background image or color to the order summary:
-
The background image should be a high-resolution image that is at least 1200px wide and 600px high.
-
The background color should be a color that complements your brand colors.
Step 6: Remove or Replace Images
To replace or remove an image from the checkout page, follow these steps:
-
Go to your Shopify Admin and select Online Store > Themes.
-
Click the Customize button next to your current theme.
-
In the theme editor, select Theme Settings > Checkout.
-
Scroll to the section where you want to replace or remove an image.
-
Under the image you want to change, click the Update button and upload a new picture.
-
Click Save.
-
To remove an image, simply click the Remove button instead of uploading a new picture.
Step 7: Customize the Typography on the Shopify Checkout Page
To personalize the typography on your Shopify checkout page, you have the flexibility to select fonts that align with your brand and enhance the visual appeal of your online store. Here's a step-by-step guide to making these modifications:
-
Access your Shopify Admin and navigate to the "Online Store" section, then click on "Themes."
-
Look for the "Customize" button next to your current theme and click on it.
-
In the theme editor, locate and click on "Theme Settings" and proceed to the "Checkout" section.
-
Within the "Typography" section, you will find options to customize the font styles for both headings and body text. Select the most suitable fonts from the provided drop-down menus.
-
Once you have made the desired font selections, remember to click Save.

By customizing the typography on your Shopify checkout page, you can create a visually consistent and engaging experience for your customers. Choosing fonts that align with your brand identity and ensure readability can contribute to a seamless and memorable checkout process.
Step 8: Customize Button and Accent Colors on Shopify Checkout
Enhancing the visual appeal and branding of your Shopify checkout page is made easy with the ability to modify buttons and accent colors. You have the flexibility to change the colors of accents such as links and checkmarks, as well as buttons for gift cards, discounts, and error messages for invalid fields. Follow these simple steps to make these color customizations:
-
Log in to your Shopify Admin and navigate to the 'Online Store' section.
-
Click on the 'Themes' option and locate the 'Customize' button next to your current theme.
-
In the theme editor, select 'Theme Settings' and find the 'Checkout' section.
-
Look for the 'Colors' section within the checkout settings.
-
Within the 'Colors' section, you'll find options to modify the colors of 'Accents,' 'Buttons,' and 'Errors.' Open the color picker for each category and choose the desired colors that align with your brand.

By customizing these buttons and accent colors, you can create a cohesive and visually appealing checkout experience for your customers. Make your Shopify store truly stand out with personalized color choices that reflect your brand identity and enhance the overall shopping journey.
Step 9: Enabling Guest Checkout
If customers are not inclined to create an account when making a purchase on your Shopify store, it can result in abandoned shopping carts. To mitigate this, enabling the guest checkout option is a simple yet effective way to boost sales. To do so, take the following steps:
-
From your Shopify admin, go to Settings > Checkout
-
In the customer contact method section, untick the "Require the customer to log in to their account before checkout" option.
-
Additionally, consider enabling Multipass to facilitate multiple pass logins and enhance the checkout experience.

Step 10: Adding Multiple Payment Methods
Customers value having a wide range of payment options to choose from when making a purchase. While PayPal may be available as a payment method for your client's Shopify store, it's important to acknowledge that not all customers will prefer or use it. In fact, a limited selection of payment options can contribute to approximately 8% of cart abandonment cases.
To address this, follow the steps below:
-
From your Shopify admin, go to Settings > Payments" section.
-
Locate the "Alternative Payments" option, which enables you to select from various payment providers.
-
Provide the necessary account credentials for the chosen provider to ensure smooth integration and enable customers to utilize their preferred payment method.

That covers the customizations that merchants on all Shopify plans with the exception of Shopify Plus can make with the Shopify theme editor. Next, we’re going to discuss the customizations Shopify Plus merchants can make.
Shopify Plus Customizations
How To Customize Shopify Checkout Using Shopify Checkout Extensibility
With Shopify Checkout Extensibility, you have the ability to implement modifications using your own custom apps or applications available on the Shopify App Store. Developers can utilize Checkout UI extensions to modify the functionality of the checkout and leverage Shopify Functions to introduce new features and customize the backend logic.
Learn More About Shopify Functions
Checkout Extensibility offers merchants the ability to customize the Shopify checkout with enhanced stability, security, and speed. Previously, modifications to the checkout were done by directly editing the checkout.liquid file, which was a cumbersome process and carried the risk of introducing errors. With Checkout Extensibility, merchants can now leverage apps for seamless customizations without the need for complex development work. Moreover, the integration with Shop Pay checkout expands the range of checkout paths available to shoppers, providing a more comprehensive and tailored experience.
The Shopify App Store holds an abundance of Shopify apps that can help you enhance and extend your store’s functionality. And Dynamic Checkout Customizer is one such app.
This app is one that allows you to perform multiple checkout customizations. The Dynamic Checkout Customizer for Shopify Plus simplifies the process of customizing the checkout page with three distinct checkout blocks. These blocks include:
-
Instructional banner for quick prompts.
-
Image banner for visual promotions and announcements or user-generated content.
-
Upsell variants block for displaying additional personalized product recommendations to enhance upselling and cross-selling opportunities.
Through these checkout blocks, the app can help you with the following customizations on your store:
-
Adding checkout instructional prompts
-
Adding checkout image banners
-
Cross-selling and upselling with personalized product recommendations
-
Creating a fear of missing out
-
Displaying trust badges
Let’s dive into how you can use Dynamic Checkout Customizer for an unmatchable checkout experience.
-
Go to the Shopify app store and search for Dynamic Checkout Customizer.
-
Install the app.
-
Go to your Shopify store settings, select checkout, and customize the checkout profile under checkout customization.
-
Click on Add App from the bottom of the left panel and select the Checkout Instruction Banner from the 3 available options.

With the checkout instruction banner, you can enter a banner title based on what you wish to instruct users with and also enter a banner description to further assist users toward a smooth checkout.
You can select a banner status from 4 options which are:
-
Info (Best for providing users with general information on the checkout process)
-
Warning (Best for guiding users of important policies or updates)
-
Success (Best to make users aware of beneficial updates or policies)
-
Critical (Make users aware of extremely important policies or updates)
You can also choose to make your instruction banner collapsible by clicking true. This will allow you to hide your banner description.
Moving on to the checkout image banner.

With the checkout image banner, you can display trust badges, as well as create a fear of missing out by displaying limited-time discounts or user-generated content.
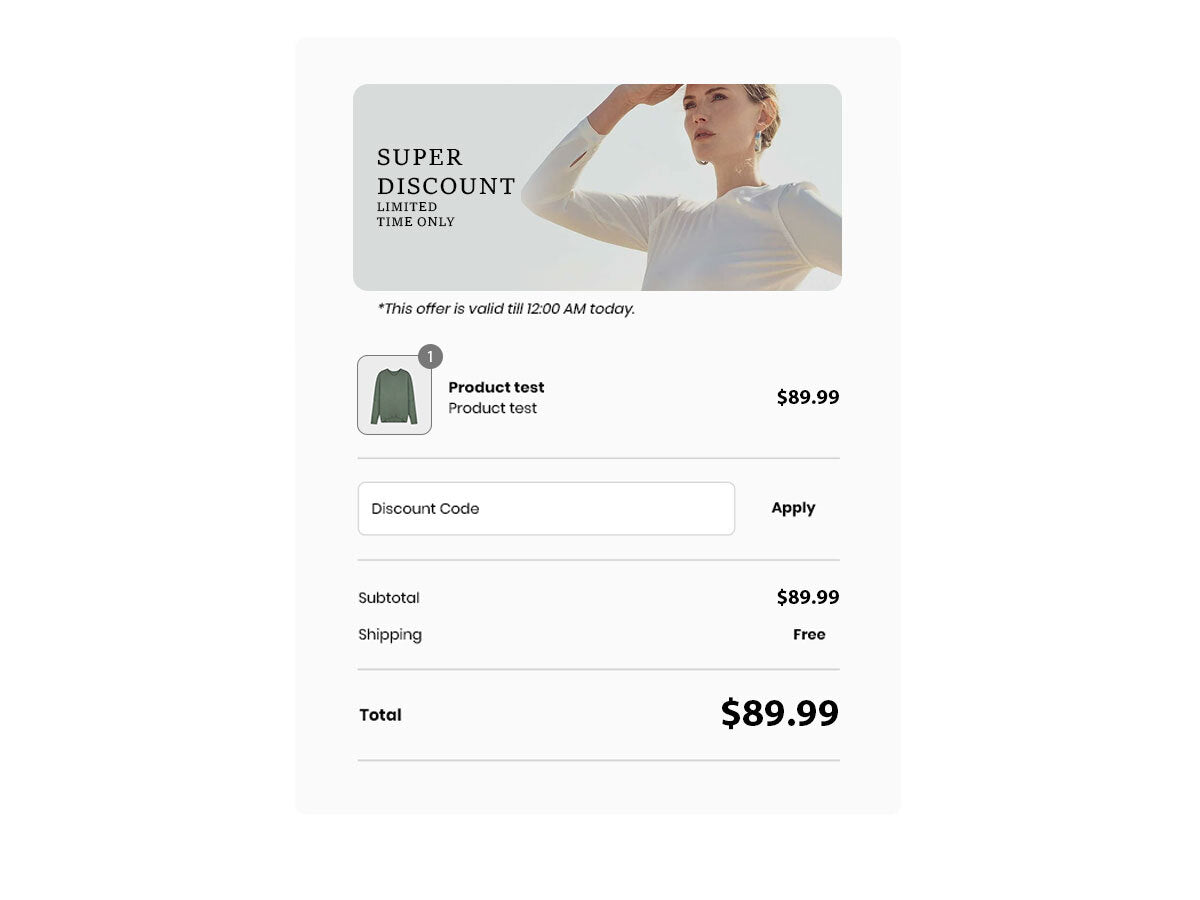
To apply this simply click on Add App from the bottom of the left panel and select the Checkout Image Banner from the available options.
Enable/Disable Image by choosing true to enable an image and false to disable it.
Enter the Image URL for the image banner. This is a link to the destination where the image is stored on your Shopify account.
Clickable Image Link. This is to send users to an external link by clicking on the image. Simply add the link to where you want users to land in case they click on the image.
Enable/Disable Text. In case you wish to add text to your image, you can do so by clicking on true under Enable Image with text
You can type your preferred text in the box under the banner text heading.
You can also select the image position. (left/right) as well as the text position and alignment as you see fit.
And last but not least, the upsell variants! This is a game changer to enhance your average order value.
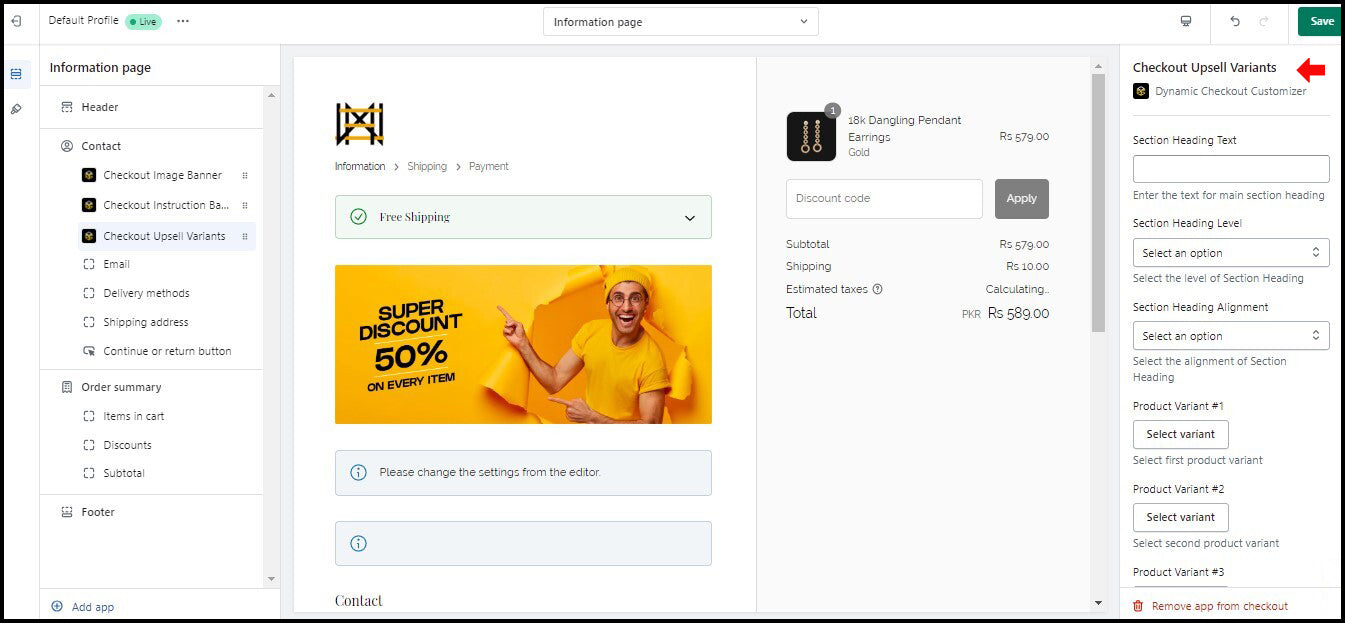
Go to your Shopify store settings, select checkout, and customize the checkout profile under checkout customization. Add App from the bottom of the left panel and select Checkout Upsell Variants from the available options.
With this checkout block, you can showcase multiple products to upsell or cross-sell on your checkout page. You can either manually add up to 4 featured products or go for customized recommendations as per your customer shopping preferences with up to 10 products.
To set up featured product recommendations start by adding a heading, you can use headings such as complete the look, recommended for you, or whatever you like. Proceed to adjust the size of the heading by choosing one of 3 options from the drop-down under Section Heading Level. You can also adjust the alignment of the heading as you see fit by choosing either start, center, or end from the drop-down under Section Heading Alignment. You can then select any 4 products to feature on your store from the drop-down menu.
To upsell or cross-sell products through metafields and make personalized product recommendations all you have to do is simply select true under metafields and add the metafield title you wish to display for all products.
Under the product title type, you can choose what you want the title of the recommendation block to be. If you add variants of the same product you should choose variant and if you choose to display other related products then you should choose products.
You can then adjust the font size from six options ranging from extra small to extra large.
You can also adjust the style of product titles from bold, italic, or normal.
Under the variant selection label, you can choose the call to action you want users to see with your chosen products. You can also choose to hide the variant they’ve already added to their cart by simply choosing yes under hide variants.
You can also adjust the layout of products with a list and scroll options
You can type in the button text as you see fit and choose a button style from 3 options which include primary, secondary, and plain.
Finally, you can adjust the font size from six options ranging from extra small to extra large and choose styles for price with italic, bold, and normal options as you see fit.
You can show up to 10 product recommendations here. A point to note here is that you must create a metafield first. You can do so by visiting settings, clicking on custom data, and finally on the add definition button in the upper right corner. Add in the namespace and key, then choose the products you want under the metafield. Below is how our client, Fame On Central applied upsell variants and grew their average order value by 20%.

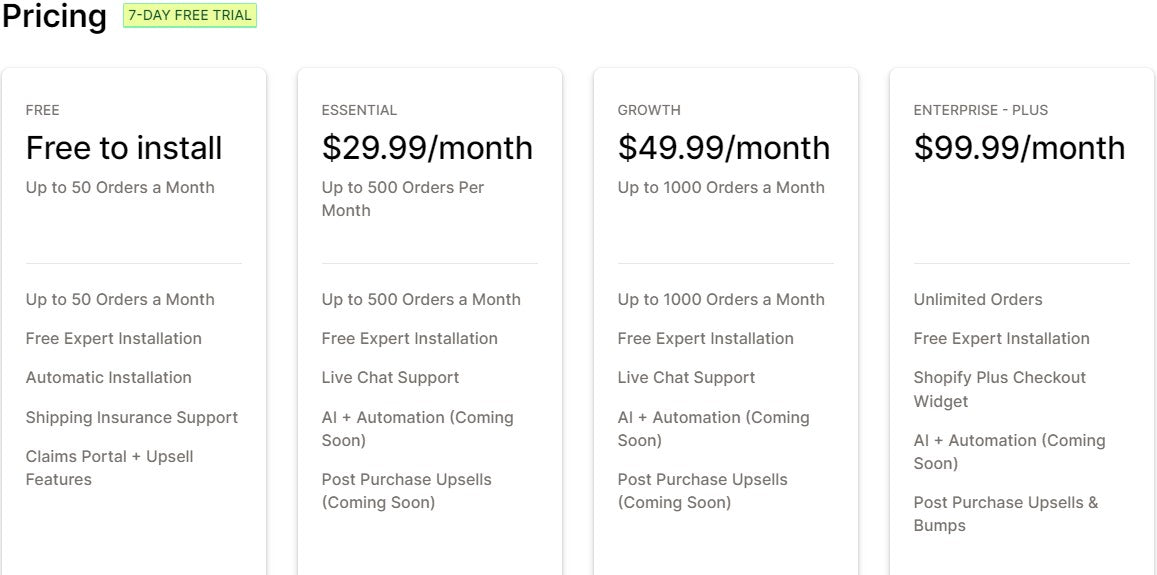
By leveraging these blocks, merchants can enhance the checkout experience for customers and boost their store's average order value. The Dynamic Checkout Customizer is exclusively available for Shopify Plus merchants through a single plan that comes with a 7-day free trial.

Learn Cross-Selling & Upselling Tips & Tricks
More Useful Shopify Checkout Customizations Using Shopify Apps
Adding A Delivery Date Picker App
With the aid of Shopify delivery date apps, you can provide your customers the option to choose a delivery date for their orders on your cart page and even your Shopify checkout page. These apps provide a range of benefits for both your customers and your Shopify store. Through these apps, you can improve customer satisfaction, lower cart abandonment rates, and streamline your shipping processes. A delivery date picker app that you should try out is Orderful.
View All Benefits Of Shopify Delivery Date Picker Apps
Orderful makes it easier for customers to schedule orders and for Shopify merchants to manage orders. This saves you time and hassle and makes it simple for your customers to choose their preferred delivery time at checkout. Instead of worrying about order logistics, you can concentrate on expanding your business with the help of this Shopify app, Orderful. Additionally, providing flexible delivery options can boost client satisfaction and loyalty.
The app offers two pricing plans, both of which come with a 7-day free trial.

Learn How To Customize Checkout With A Delivery Date Picker App
Displaying Shipping Security
Another vital aspect to consider is shipping security. Shipping security is crucial to Shopify customers for several reasons. It ensures the safe and intact delivery of orders, builds trust, protects customer information, and minimizes the risk of identity theft or fraud. Reliable shipping security enhances customer satisfaction and encourages repeat purchases, fostering brand loyalty.
To ensure shipping protection, you can use the Shopify app Navidium Shipping Protection.
Navidium offers Shopify merchants a unique opportunity to take control of their shipping protection plans. With Navidium's self-service platform, you can create your own customized shipping protection plan and efficiently handle claims from your customers. By eliminating the need for a third-party insurance provider, you retain 100% of the collected premiums, maximizing your profits. It is important to note that Navidium is not an insurance company and does not underwrite plans.
The app offers four pricing plans, the details of which are shown below:
That covers the customizations you can make with the Shopify Checkout Extensibility. Next, we’re going to discuss the customizations you can make using Shopify Checkout Editor.
How To Customize Shopify Checkout Using The Checkout Editor
Step 1: Add a logo to your checkout's header
To enhance your brand identity, you should start by incorporating your logo into the checkout header. You can also customize the logo's size, alignment, and position to create a cohesive and seamless brand experience. Here's how you can make it happen:
-
From your Shopify admin, go to Settings > Checkout.
-
In the Checkout branding and customizations section, click Customize next to the checkout you want to edit.
-
Click the paintbrush icon.
-
In the Logo area, add your logo
-
Click Select image.
-
Click Add Images to upload a new image or select another one you've already uploaded to your library.
-
Click Done.
-
In the Logo Max Width area, adjust the size of your logo.
-
In the Logo Alignment area, select the left, center, or right alignment of your logo.
-
In the Logo Position area, select a checkout form, order summary, or full-width position for your logo.
-
Click Save.
Step 2: Customize Checkout Forms
To elevate your checkout form, consider giving it a personalized touch by adding a background image or color. Choose between a captivating image or a harmonizing color scheme to create a visually appealing checkout experience. However, remember to ensure that your checkout fields remain easily readable even with the background customization. Below is how you can do so:
-
From your Shopify admin, go to Settings > Checkout.
-
In the Checkout branding and customizations section, click Customize next to the checkout you want to edit.
-
Click the paintbrush icon.
-
In the Checkout Form section, add a background image or a color

To add a background image, do the following:
-
Click Select image.
-
Click Add Images to upload a new image or select one you've already uploaded to your library.
-
Click Done.
To add a background color, do the following:
-
Click the color circle next to the Background color to open a color picker.
-
Choose a color or enter a hexadecimal color code.
-
Click Save.
Step 3: Customize Order Summary
To further enhance the visual appeal of your checkout, adding a personalized background image or color to the order summary is a good option. Opt for a background color that complements your branding or select a captivating image to create a memorable impression. However, ensure that the clarity of your checkout fields is not compromised by ensuring they remain easily readable even with the background customization. We’ve outlined the steps below:
-
From your Shopify admin, go to Settings > Checkout.
-
In the Checkout branding and customizations section, click Customize next to the checkout you want to edit.
-
Click the paintbrush icon.
-
In the Order Summary section, add a background image or a color

To add a background image, do the following:
-
Click Select image.
-
Click Add Images to upload a new image or select one you've already uploaded to your library.
-
Click Done.
To add a background color, do the following:
-
Click the color circle next to the Background color to open a color picker.
-
Choose a color or enter a hexadecimal color code.
-
Click Save.
Step 4: Customize Checkout Colors
You can take full control over the appearance of your checkout buttons, error messages, and accents by selecting the desired color options. Additionally, you have the flexibility to set your checkout fields as either white or transparent, further enhancing the overall aesthetic.
However, it's important to ensure that the changes you make to the colors of your checkout page do not compromise the readability of the text. Prioritize legibility by ensuring that the text remains clear and easily readable against the backgrounds of the order entry and order summary areas. This will guarantee a smooth and seamless checkout experience for your customers. Below is a breakdown of how:
To change accent, button, and error colors:
-
From your Shopify admin, go to Settings > Checkout.
-
In the Checkout branding and customizations section, click Customize next to the checkout you want to edit.
-
Click the paintbrush icon.
-
In the Color section, choose the colors:
-
Click the color circle next to Accent, Buttons, or Error to open a color picker.
-
Choose a color or enter a hexadecimal color code.
-
Click Save.
To change the color of the form fields:
-
In the Color section, click the Form Fields drop-down menu, and then select the white or transparent color. If you set a custom value for form fields using the Checkout Branding API, then an additional Custom (Set via API) option is displayed.
-
Click Save.

Step 5: Customize Checkout Font
You can choose from a diverse range of fonts available to create a unique and engaging checkout experience for your customers. With the ability to select from a list of fonts, you have the power to align the typography with your brand's identity and create a consistent visual representation throughout the entire purchasing process. Your font choice should reflect your brand's personality and enhance the overall aesthetic appeal of your checkout page.
-
From your Shopify admin, go to Settings > Checkout.
-
In the Checkout branding and customizations section, click Customize next to the checkout you want to edit.
-
Click the paintbrush icon.
-
In the Typography section, change the font of your checkout text headings and body:
-
In the Headings or Body area, click the font name to open a drop-down menu.
-
Select the font that you want to apply to your checkout.
-
Click Save.

Step 6: Enabling Signup For SMS and Email Marketing
During the checkout process, you can allow customers to subscribe to receive text messages from your brand, providing them with exclusive offers, sales updates, and new releases. They can easily join your SMS and Email subscriber list by simply checking the opt-in box.
Enabling this checkout opt-in feature is straightforward:
-
From your Shopify admin, go to Settings > Checkout
-
Find the Marketing Options heading.
-
Tick the SMS and Email marketing checkbox to activate the option for customers to opt into SMS and Email communications during their purchase.
 And now let’s move on to creating a one-page checkout.
Create a One-Page Checkout
During Shopify's 2025 Winter Editions product release, an exciting announcement was made regarding the upcoming launch of Shopify's new one-page checkout. This highly anticipated feature will be made available to all Shopify plans in the near future. To get a glimpse of what the new one-page checkout will look like, you can visit Shopify's merchandise store at shopify.supply, where you'll find an example of the checkout design.
Learn All About Shopify Winter 25 Editions
The text fields have sharper corners, and the call-to-action buttons are vibrant and pill-shaped. These customizations are made possible through Shopify's Checkout Branding API.
It's important to note that while the highly anticipated one-page checkout is on its way, it is currently not available for standard Shopify plans. However, merchants on the Shopify Plus plan can implement the one-page checkout. It's worth considering that the Shopify Plus plan comes with a higher cost of 2,000 USD per month compared to the standard plan. Therefore, it's advisable to carefully evaluate the advantages and disadvantages of implementing a one-page checkout before making the switch.
If you are on the Shopify Plus plan and wish to set up a one-page checkout, follow these steps:
-
Log in to your Shopify Plus store admin dashboard.
-
Navigate to Settings > Checkout.
-
Select Customize.
-
Scroll down to Checkout Layout and choose One Page Checkout.
-
Proceed with customizing your one-page checkout.

With these steps, Shopify Plus merchants can enjoy the benefits of the streamlined and user-friendly one-page checkout experience.
That covers all aspects related to customizing your Shopify and Shopify Plus checkout page. Now let’s talk about how you can test your Shopify checkout page.
Test and Measure the Effectiveness of Your Shopify Checkout Page
After completing the customization of your Shopify checkout page, it is crucial to test and measure your average order value strategy. By conducting tests, you can assess the efficiency of the implemented changes and determine what works best for your online store.
One approach is to compare your customized checkout page with the default settings or contrast specific features. It is recommended to track key metrics such as conversion rate and average order value. Through thorough testing, you can ensure a top-notch checkout experience that drives optimal effectiveness for your store.
Learn All About Testing And Optimizing Your Average Order Value Strategy
Conclusion:
Boosting the average order value through Shopify checkout customizations is a powerful strategy for e-commerce success. By following our guide, you can create a compelling shopping experience that drives your average order value to skyrocketing heights.
Remember, each customer interaction is an opportunity to increase revenue, and with strategic customizations, you can take your Shopify store to new heights of profitability. Start implementing these techniques today and witness the positive impact on your AOV and overall business growth.


