

Table of Content
In the dynamic and rapidly evolving world of e-commerce, the key to success lies in establishing a strong and reputable online presence. At the forefront of this endeavor is the need for a reliable and aesthetically pleasing Shopify store. By building a Shopify store that is not only functional but also visually captivating, you can effectively engage your target audience and leave a lasting impression.
Shopify is a well-known e-commerce platform that offers many features and advantages to assist merchants in setting up and running their online stores. It provides a simple user interface, responsiveness for mobile devices, safe hosting, and dependable customer service. Even without any technical knowledge, you can quickly set up a store using Shopify.

Our thorough tutorial will teach you the essentials of developing a Shopify store and provide insights into the different customization choices available, enabling you to give your consumers a distinctive and exciting shopping experience.
Let's get started
Choose Your Plan & Register An Account
You must first register for a Shopify account in order to begin constructing your store. Shopify offers different pricing tiers to cater to businesses of all sizes.
The plans include:
Main Plans
-
Shopify Basic
-
Shopify
-
Shopify Advanced
Alternative Plans
-
Shopify Starter
-
Shopify Plus
Each plan comes with its own set of features, transaction fees, and limitations. Consider your business size, budget, anticipated sales volume, and desired features when choosing the right plan for your store.
Shopify is presently offering a 14-day free trial to help merchants get started on even a tight budget. After that, it is only US$ 1 per month for the following two months. Do note that, depending on your country, prices may change.
It will only need your email address and some basic information about your company to get started. So, it won't take long for you to finish this phase.
Your free trial will begin right away as soon as you establish an account, and you'll be on the Shopify admin panel or dashboard. If you're brand-new to Shopify, it's crucial that you comprehend all of the parts and options that are offered in the Shopify admin and how they operate.
So first, check out all the Shopify admin tabs and options. Reviewing them will give you a good concept of what those tabs are for and help you become more accustomed to the platform.
You'll also find a section titled Setup Guide, where some of the crucial procedures for setting up your business are listed. You will be able to track your progress in this area as you finish those activities.
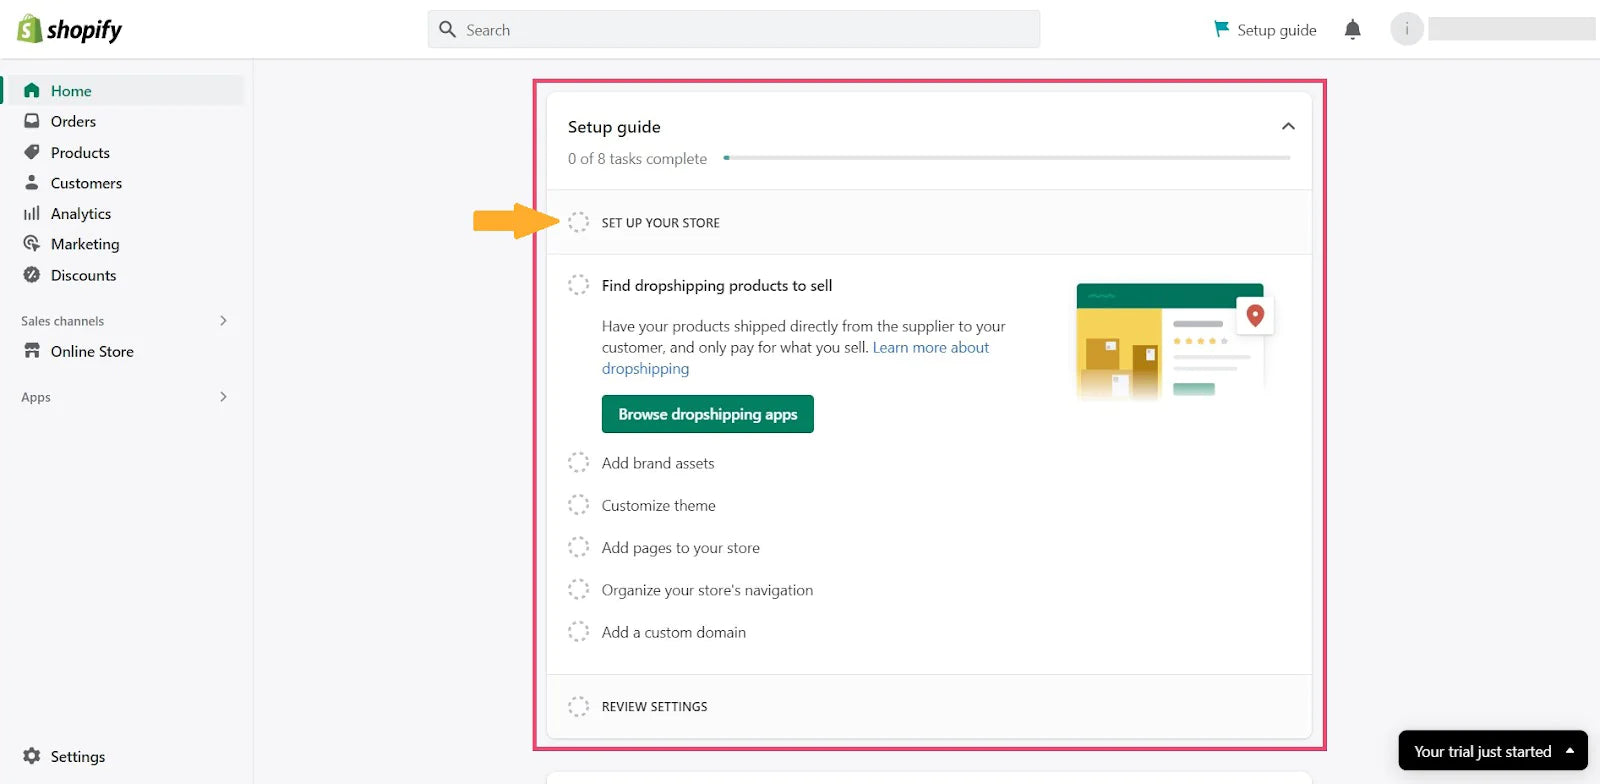
You can view all the Shopify settings that need to be customized for various tasks and purposes by selecting the Settings tab in the screen's bottom left corner.

In the following sections of this blog, we'll discuss some of the essential settings.
Pick or Purchase a Custom Domain
Your store's Shopify URL by default would be something like gp-tutorial.myshopify.com. However, you need to get a custom domain name like yourstore.com or yourstore.net to give your company a distinctive identity.
There are primarily two methods for integrating a custom domain name with your Shopify store:
By heading to Settings > Domains, you may purchase your own domain name from Shopify.
Purchase a custom domain from a third-party seller, then go to Settings > Domains and connect it to your Shopify store.

It could be intimidating to look at this lengthy list of items on the Settings page. It is best to start focusing on one issue at a time instead. Additionally, there are many resources available to sort things out. On that note, let’s move on to the next step of picking your Shopify theme.
Learn about the latest updates from Shopify
Pick a Shopify Theme
Shopify themes are website templates that provide you with a layout and tools to organize and construct your online business.

You can structure and build your online business using the tools and layout provided by Shopify themes, which are website templates to help you design your store.
As soon as you launch your store, the Dawn theme will already be set up. You might want to visit the Shopify theme store to select one for your company, though. In addition to that, you can also utilize third-party websites or the services of independent Shopify theme developers.
Shopify Theme Store

Shopify provides both free and premium themes. You have a wide range of possibilities to choose a theme that satisfies your brand's aesthetic and your company's needs, ranging in price from $0 to $350 (one-time fee).
Go to Shopify admin and click on Online Store>Themes to browse through all of the themes available in the Shopify theme shop. Then, as you continue to scroll down, sections labeled Popular Free Themes and Explore More Themes will appear.
Additionally, you may filter themes by several categories by clicking All themes at the top, such as:
-
Price
-
Number of products
-
Industry
-
Layout complexity
-
Design style
For stores that don't require a customized store experience, using a pre-built premium theme might make Shopify theme customization exceptionally quick.
Before making the final adjustments on their own or using a page builder, merchants may find it helpful to use pre-built themes to come closer to their ideal look.
It could take some effort and testing to find the ideal theme for your Shopify store. The good news is that all the themes offered in the Shopify theme store have sample stores called demo stores that you can check out. By doing this, you can understand how each theme looks and choose which one best represents your business.
Third-Party Platforms & Independent Shopify Theme Developers
Don't panic if you can't discover a theme that appeals to you in the Shopify Theme Store. Themes designed specifically for Shopify sites are available from other online platforms.
Shopify themes created by independent developers may be bought on platforms like Envato. Since themes in these markets are frequently peer-reviewed, you may filter based on ratings and popularity or by the themes that are most popular with customers.

Your theme will be available to you immediately in your theme library in your Shopify dashboard if you bought it from the Shopify Theme Store. To begin customizing a theme, simply click "Customize" within the theme. Make it your current theme by just clicking Actions and Publish.
Prior to customizing a theme that you have purchased from a third-party website or developer, you must first upload it.
Upload your theme by visiting Online Store > Themes. From the Theme Library menu, select "Add Theme". You can either upload from a zip file or connect from GitHub.
Uploading your theme most usually involves utilizing a zip file. You may drag and drop a file into the appropriate window or click the "Add file" button to add a file. then choose the "Upload file" option. The file will show up in your theme library when the upload is finished.
There's no need to rush into choosing a paid theme if you're thinking about it. Without paying for it, you may install the theme and test it out on your store. When you're ready to publish the theme and put it live on your store, that's when you need to make the purchase.
Remember, the theme selection process should align with the nature of your business and the products you intend to sell. So take your time, explore different themes, and consider the specific needs of your business. With a bit of research and testing, you'll discover the perfect Shopify theme that brings your store to life and represents your brand in the best possible way.
Customize Your Theme
The fun and exciting phase now officially begins! If you're a fan of creativity, this section of your Shopify adventure will be your favorite by far. Setting up your brand's online presence and style is all about customizing your business.
Your Shopify theme may be customized primarily in four ways:
Using The Theme Editor
You can only make simple changes by using the Shopify theme editor. You may alter the various components that are included in your theme using the Shopify theme editor. The categories in your online store can be altered in terms of placement, appearance, or hiding.
In the Shopify admin, select Online Store > Themes to edit your theme.

In your Themes dashboard, you'll find your Current theme and Theme library. The Current theme provides a basic preview of how it looks out of the box. By clicking the "Customize" button, you can customize either your current theme or a theme waiting in your library.

Click the customize option. The theme editor will then open, where you can begin customizing your theme.

There are two primary methods of customizing your store's theme: editing page templates and changing theme settings.
Editing page templates gives you control over the layout of different page types, allowing for reuse across your store. Multiple page templates are available for building out your store.
On the other hand, general theme settings allow you to make global changes that impact your entire store, including color schemes, typography, styles, and more.
Using Third-Party Shopify Apps
You could also use a third-party app to customize the look and feel of your theme. Third-party apps can add new features and functionality to your Shopify store that may not be available with the built-in features of the Shopify theme editor. This can help your brand stand out amongst competitors, allow you to provide a better user experience for your customers, and streamline your business operations. Visit the Shopify app store to browse apps that you can use.
Using A Customizable Theme
Selecting a theme that is customizable gives you access to a more robust editor that enables improvements like motion effects, unique headers and footers, sales-boosting add-ons, and more. This solution has the benefit of not requiring any further costs.
Customize Using Coding
Manual customization through code gives the maximum level of freedom and control for people with coding knowledge and technical competence. You may make exact customizations by going to Online Store > Themes > Action > Edit Code.
We're going to concentrate on theme adjustments using the built-in Shopify theme editor for the sake of this article.
Your current theme and your theme collection may be found in your theme dashboard. A brief sample of how your current theme would look will be displayed.
By selecting the "Customize" option, you may make changes to the current theme or one that is already waiting in your library.
Editing page templates and customizing theme settings are the two primary methods for personalizing the theme of your store.
You may reuse the layout of various page types across your store by editing Shopify templates. This will allow you access to several page templates as you start to build out your store.
Color, typography, styles, and other elements will all be altered globally throughout your store as a result of your general theme choices.
Let's start with templates before moving on to the general theme settings.
Customizing The Shopify Template With The Theme Editor
Before anything else, it should be noted that you customize page templates rather than actual pages while using the theme editor.
Therefore, any modifications made to a specific template will be shown on all pages that use that template.
A drop-down menu is located at the top of the theme editor. Although "Home Page" is the default, you can alter any page template.
Whatever page template you choose will appear on the main edit panel.
You can view the current page's section arrangement on the left side. All themes allow for section customization in the theme editor for only the homepage template, however, Online Store 2.0 themes allow this functionality for every page template.
How To Customize Shopify Templates With The Theme Editor
Let's dive into customizing Shopify template sections! By tweaking these sections, you can have more control over how your store feels and appears, all while working within your theme's boundaries.
Now, there are a variety of sections available, some of which you can shuffle around, and others that stay put. You've got your trusty headers and footers fixed in place. There are also sections like featured collections and image blocks that can groove anywhere between your header and footer, depending on what floats your boat.
The best part? Each of these sections comes with its own set of customization options, so you can truly make it match your brand image!
Header Customization
Now let's dive into customizing the header section! This is where you can add your personal touch in a few different ways. Since the header appears on every page of your store, any changes you make here will be reflected across all store pages.
Here's a break down of some of the things you can tweak in your header, using the Dawn theme as an example:
-
Swap out your logo image
-
Adjust the width of your custom logo
-
Fine-tune the positioning of your logo on large screens
-
Customize the navigation menu
-
Add a stylish separator line
-
Activate a sticky header that stays put as your customers scroll
Footer Customization
Similar to the header, any updates you make to the footer will be applied throughout all your store pages.
Now, keep in mind that the available options may vary depending on your theme. In the case of the Dawn theme, here are some of the customization settings you can play around with:
-
Theme-based color scheme options to match your brand
-
Adding an email subscription form for easy sign-ups
-
Displaying social media icons to connect with your audience
-
Country/region selector for a personalized experience
-
Language selector to accommodate different language preferences
-
Payment method icons to showcase accepted payment options
But wait, there's more! You can take it a step further by adding blocks to your footer section. By default, quick links are included, but you can update them with important navigation links. Additionally, you have the option to insert a heading block, which allows you to include a heading and subtext.
Customizing Individual Sections
Remember that any adjustments you make will only have an impact on the current page template.
When you first begin, all you need to do is click on a section to be given a menu of customization options. It is possible to customize each area in a special way.
The preview screen will display the changes as you make them in real time, just like with the header and footer.
Consider the Featured Collection section, for illustration. This area gives you the freedom to select the collection to highlight, pick how many goods to show, and modify the picture display options.
However, the Image With Text section offers a more limited range of choices. You can select an image, modify its display settings, and then proceed to input the necessary information into the designated blocks.
You're not limited to the predefined sections available on each page template. You have the flexibility to further enhance and personalize your pages by adding new sections (and blocks).
To incorporate a section into your page template, simply click on "Add Section" and choose the desired theme section from the list (or utilize the search tool to locate what you're looking for).
In the Dawn theme, you have the freedom to include sections such as
-
Collage
-
Featured Collection
-
Multicolumn
-
Custom Liquid
-
Blog Posts
-
Email Signup
Locate the desired element and click on it. You'll notice it appearing at the bottom of your page, right above the footer.
Once added, you're not limited to its placement at the bottom. Feel free to move it up or down as per your requirements.
Reposition Sections
To reposition a section, simply hover your cursor over it until the six-dotted icon appears. Your cursor will transform into an open white-gloved hand.
Click on the icon and drag the section to your desired location. The preview screen will zoom out, allowing you to see how the section looks as you move it up and down the page.
Once you feel satisfied with its placement, release the section, and it will settle into its new position.
By following these steps, you have now explored the complete range of options for customizing your page templates. We encourage you to thoroughly examine all the customization possibilities specific to your chosen theme.
Now let’s move on to changing your Shopify theme settings.
Customizing Your Shopify Theme Settings
In addition to customizing individual templates, you also have the option to modify certain general parameters that dictate the appearance and functionality of your theme.
To access these settings, look in the lower-left corner of your editor and click on "Theme Settings". This will open up a menu displaying the available options.
The specific categories you can adjust will vary depending on the theme you have selected. Here are a few examples of what you might find in different themes:
-
Colors: Customize the color scheme of your theme
-
Typography: Adjust the font styles and sizes used in your theme
-
Styles: Modify the overall visual style of your theme
-
Favicon: Set a custom favicon for your website
-
Social Media: Configure settings related to social media integration
-
Checkout and Search: Customize the appearance and functionality of the checkout and search features
-
Add to Cart Notification: Control how the notification for adding items to the cart is displayed
-
Theme Style: Choose a different style variation for your theme
It's important to note that any changes you make to the theme settings will affect the modifications you have made to your page templates, as these settings govern certain features of your theme.
Customizing Colors
Within this menu, you have the ability to customize the colors that represent your brand throughout your entire store.
You can make adjustments to the following color aspects:
-
Solid button labels
-
Accents
-
Text
-
Outline buttons
-
Backgrounds
By updating these settings, you can ensure that your store aligns seamlessly with your brand's unique style. This is particularly beneficial if your brand has a distinct color scheme, as it allows you to maintain consistency and reinforce your brand's identity.
Customizing Typography
In this section, you have the flexibility to update the appearance of text throughout your entire store. By making small typographic changes, you can truly showcase the personality of your business.
If you have specific custom fonts or Google fonts that you would like to incorporate into your store, you can follow the provided instructions to add them. Once added to your Shopify store, you will be able to select them from the theme options.
To personalize your typography, you have simple choices such as Body and Headings fonts. Keep in mind that depending on the theme you are using, there may be additional typographic options available beyond those offered in the Dawn theme.
Customizing Styles
In this user-friendly menu, you have the flexibility to customize color schemes and icons to match specific scenarios, such as sales or out-of-stock products.
Social Media Integration
Make sure your social media presence stands out and encourages interaction by showcasing your social media profiles. Neglecting this aspect could mean missing out on potential visitors and conversions.
With this menu, you can conveniently integrate your social media accounts into one central location, making them accessible throughout your entire store.
Additionally, you have the option to choose which share options visitors see, further enhancing the integration of your social media platforms.
Favicon Customization
The favicon is the small image that appears on the browser tab or next to the URL when your store is accessed.
In this setting, you can effortlessly upload your store's favicon and have it automatically scaled to the appropriate size of 32x32px.
If you don't have a favicon for your online store, Shopify provides a collection of free images that you can utilize.
Alternatively, you can explore various online conversion tools that simplify the process of transforming your existing logo into a favicon.
Checkout Customization
The checkout page holds immense significance for an online store, which is why it has its dedicated theme-setting menu.
Within this menu, you'll discover various options for personalizing your checkout, such as:
-
Uploading images for the banner and logo
-
Adjusting logo size and positioning
-
Choosing background images and colors for the main content and order summary
-
Customizing typography
-
Modifying colors
To further enhance your checkout experience and increase your average order value, you can leverage Shopify apps like the Dynamic Checkout Customizer. This app empowers you to incorporate three customizations into your checkout process, including:
-
Checkout Instruction Banners
-
Checkout Image Banners
-
Upsell & Cross Sell Products
By leveraging the capabilities of the theme editor and updating your theme's settings, you can exert a significant level of control over the appearance and feel of your store, aligning it seamlessly with your brand identity and optimizing your conversion rate.
Learn More About Dynamic Checkout Customizer
Moving on to store elements.
Add Products To Your Store
One of the most crucial tasks for your Shopify business is adding products. After all, you'll be selling that at your business, right?
Reviewing the procedures for adding items to your Shopify store will help.
Click on Products > Add Your Products in the Shopify Admin section of the website. Add items to Shopify using one of two methods:
To gradually add items to your store, click the green Add your products button. When you click this button, Shopify's admin will automatically construct a product page.

Alternatively, you may use a CSV file by selecting the Import option in the top right corner. If you already have items uploaded on another platform and wish to import or migrate them to Shopify, you may also use this step. Bulk editing of your items is also helpful.
You may also click "Find products to sell”. The Shopify app store will be opened when you choose this option to see Shopify's suggested product-sourcing applications. If you're setting up a print-on-demand or dropshipping store, this could be helpful.
To add your products to Shopify, go through the eight steps below, one at a time.
Provide A Product Title And Description
Your product's description and title both explain what it is all about. Make sure you take the time to write thorough and engaging product descriptions. Additionally, employ relevant keywords to improve the SEO of your product pages.
Add Media
You may post your product's pictures, videos, or 3D models in this area. Include photographs of your items that are of a high standard but not too large. To reduce the impact on your page's loading time, you can incorporate YouTube or Vimeo URLs for videos.

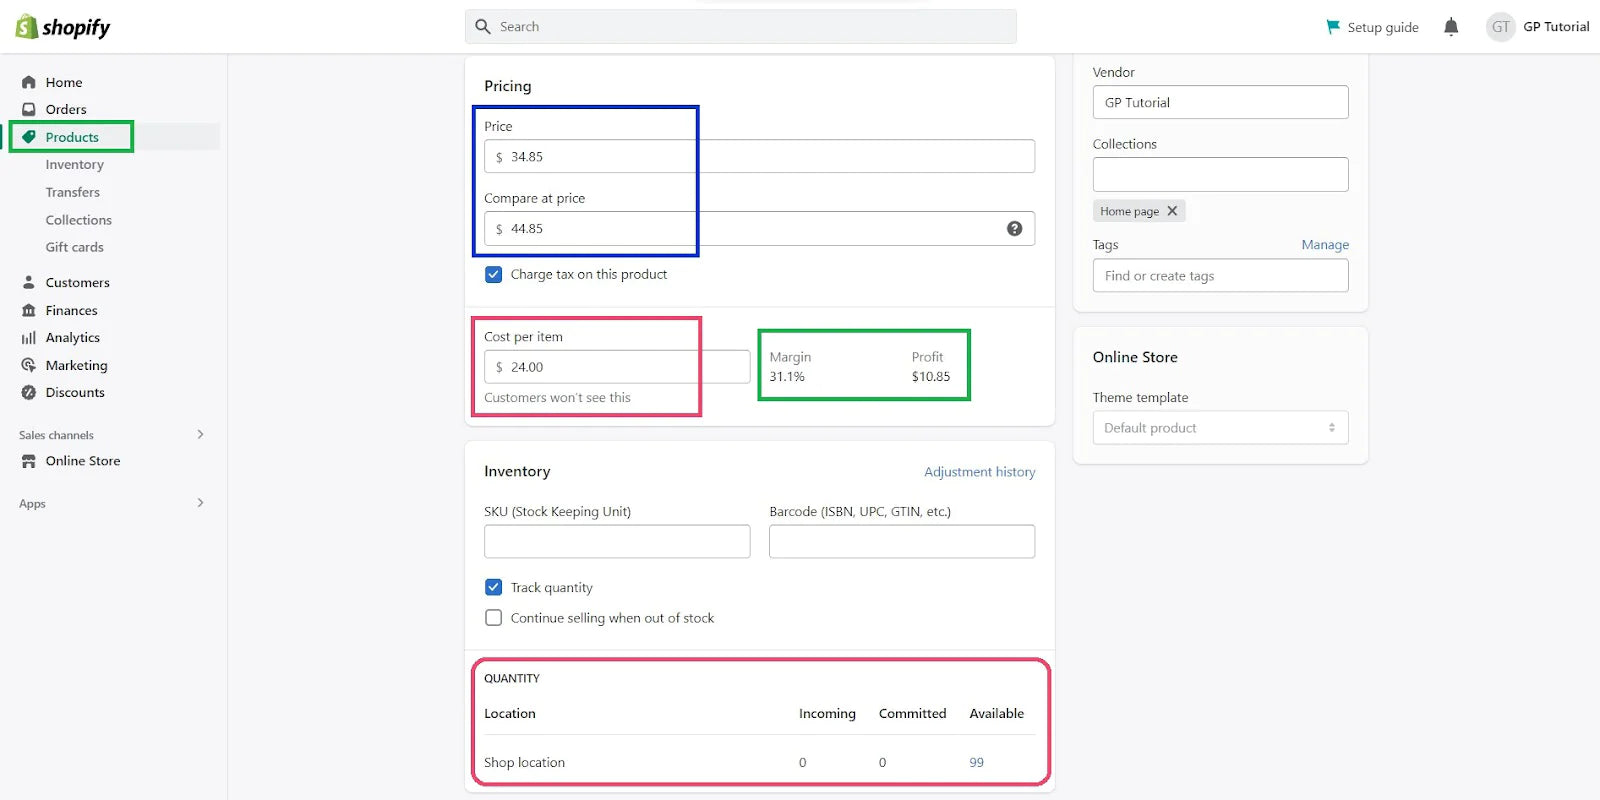
Add Pricing
Include the sale price of your product under "Price". You use "Compare at Price" to view the difference between the original and the sale price and "Cost per Item" to compute the gross profit margin.
Add Inventory
The SKU (stock-keeping unit) and barcode, as well as other inventory-related information, can be entered here. It also enables you to monitor or control inventories.
Add Shipping
You can choose to say if the item is a tangible one in this section. Additionally, it has fields for adding "Weight" and "Customs Information" sections.
Add Options
This area will assist you in creating product variants if your product comes in many variations with various colors or sizes.
Customize Your Search Engine Listing
Customization options are available for the page title, meta description, and URL handle that appear in Google search results. These can be adjusted in the section dedicated to search engine listings. It is recommended to keep the meta/product title within 60 characters and the meta description within 155 to 160 characters. It's important to note that Google may disregard any content that exceeds these character limits.
Organize Products And Edit Product Statuses
You may organize your items using different product categories and collections with the aid of product organization fields.
With product status, when you're not quite ready to publish a product, you may preserve it as a draft. Once all of the information has been entered, you may change the status of the product page to Active to make it live and available for purchase.
The next part of our blog will focus on how you can enhance your store's functionalities.
Extend Your Store’s Functionality With Essential Shopify Apps
Shopify apps are extensions that you may add to your store to bring additional features or capabilities that aren't included in Shopify by default. You can visit the Shopify App Store to find apps for your store.

Installing Shopify apps may serve a variety of purposes, and the ones you install will depend on your company's needs.
View The Best Shopify Apps Of 2023
Below is a list of recommended categories for which you should consider adding Shopify apps to your Shopify store to ensure peak performance.
UI/UX Design
Enhance the aesthetics of your storefront pages with stunning building designs! With professionally crafted blocks, components, and themes, you can effortlessly elevate the look and feel of your online store. Not only that, but you can also create captivating landing pages to make a lasting impression on your visitors.
SEO
These apps often provide keyword research and analysis, on-page optimization suggestions, and even automated SEO optimizations. By implementing SEO apps, Shopify store owners can improve their search engine rankings, increase their website's visibility in search results, and ultimately drive more qualified traffic to their online stores.
Social Media Marketing
These apps can amplify your online presence. You can effortlessly manage multiple social media accounts, schedule posts, create engaging content, and track performance metrics. By leveraging social media platforms, you can boost brand awareness, attract more customers, drive traffic to your store, and ultimately increase sales.
Influencer Marketing
Harnessing the power of influencer marketing with dedicated Shopify apps unlocks a host of benefits for your Shopify store. These apps enable you to connect with relevant influencers in your niche, streamline collaboration, and track campaign performance. By leveraging influencer partnerships, you can expand your brand's reach, tap into new audiences, and build trust among potential customers.
Affiliate Marketing
You can easily set up and administer an affiliate program using affiliate marketing applications, enabling partners and influencers to sell your items in exchange for a commission. These tools offer a streamlined platform for handling rewards, tracking referrals, and keeping an eye on performance. Utilizing the effectiveness of affiliate marketing, you can reach a larger audience, broaden your market, and increase revenue.
Learn How to Start An Affiliate Program For Your Shopify Store
Email Marketing
Email marketing apps provide a user-friendly interface to design and send captivating email campaigns, automate customer journeys, and analyze campaign performance. With these apps, you can effortlessly build and grow your subscriber list, personalize emails based on customer behavior, retarget customers, and drive engagement and conversions. This allows you to stay connected with your audience, nurture customer relationships, and drive repeat sales with targeted email marketing strategies.
Upselling & Cross-Selling
Boost your revenue and enhance customer satisfaction with upselling and cross-selling Shopify apps. You can easily offer additional products or upgrades during the purchase process, increasing order value and driving repeat sales. These apps provide customizable features to showcase related items and offer special discounts, giving customers a personalized shopping experience.
Learn Upselling & Cross-Selling Tips & Tricks
Customer Service
Enhance your customer support and provide a seamless experience with customer service apps for your Shopify store. With features like live chat, order tracking, and feedback management, you can efficiently address customer inquiries and offer personalized assistance. Elevate your customer service game, build trust, and foster loyalty by integrating these apps.
Loyalty Programs
Supercharge customer loyalty and drive repeat purchases with loyalty program apps designed for your Shopify store. You can easily reward and engage your customers with point systems, VIP tiers, and exclusive discounts. With these apps, you can incentivize customer engagement, foster loyalty, and create a dedicated customer base.
Now that that’s cleared up, let’s move on to how you can add payment gateways to your Shopify store.
Add Payment Gateways On Your Shopify Store
Your business's financial health as well as the satisfaction of your customers are both impacted by the means you use to receive payments from them. As a result, it's crucial that you provide your customers with payment methods they feel secure using, while also considering the percentage of fees the payment processor will keep.
Four main methods of payment are available:
Shopify Payments
Depending on your membership level and an additional $0.30, Shopify Payments charges credit cards at a rate ranging from 2.4% to 2.9%. Do note that only a select number of countries offer Shopify Payments.
PayPal
If you're selling in the United States, there is a processing charge of 2.9% of the transaction's total value plus a flat cost of US $0.30 (depending on the currency of the payment). The total charge for accepting payments outside of the United States is 4.4% of the transaction plus a set fee calculated using the local currency.
Third-Party Payment Service Providers
These providers offer different pricing structures and transaction fees that may impact your overall processing costs. It's advisable to research and compare the offerings of different payment service providers to ensure you find the most cost-effective solution for your business. By carefully selecting the right provider, you can optimize your payment processing costs and maximize your profitability.
Manual Payment
Manual payment methods can provide flexibility and cater to different preferences. With manual payment methods, you can offer alternatives such as bank deposits, money orders, cash on delivery (COD), and even create custom payment methods tailored to your specific needs.
Here’s how:
Go to the Shopify Admin and select Settings > Payments to configure your payments.
Following that, decide which payment method you wish to include in your store. You will see an Activate Shopify Payments button if you are qualified to implement Shopify Payments.

After selecting the Activate Shopify Payments button, fill out the necessary information and follow the instructions under the "Complete account setup" option to finish the process.

You may also choose and enable other payment providers by going through their setup procedures.

It's preferable to complete this straight away because your information may need to be validated, which might take a day or two.
Set Up Shopify Sales Tax
You might have to charge customers for taxes on the goods and/or services you provide. As a result, you must record and pay any taxes you collect from your customers to the appropriate authorities in accordance with the law.
Your company can be required to pay different taxes based on your nation, state, and location. Additionally, governments may occasionally amend their tax laws.
You must remember that Shopify doesn't file or remit any sales tax payments on your behalf.
In What Ways Does Shopify Assist With Sales Tax?
The good news is that Shopify can really make things simpler for you. Using the worldwide default sales tax rates, Shopify manages the tax computations. Additionally, the reports that Shopify offers might be useful when it comes time to submit and pay your sales tax obligations.
To make sure you're charging your customers the correct sales tax, Shopify nonetheless advises that you conduct your own research or speak with a tax expert. You wouldn't want to wind up collecting less sales tax than necessary and having to spend money out of pocket to set up sales tax on Shopify.
Go to Shopify Admin and choose Settings > Taxes and Duties to configure taxes.
First of all, you must decide which areas you will be collecting taxes from. Create a list of every country your business will be shipping to. You would need to set up the tax rates for Shopify POS (point of sale) in accordance with your store locations.
Create a shipping zone for each area where taxes must be paid. Once complete, the areas may be found by going to Taxes and Duties > Manage sales tax collection.
Decide On Your Tax Rates
Establish the tax rates for the nations and areas where you intend to sell and export your goods. Follow Shopify's guidelines for digital product taxes for digital goods.
You might need to override Shopify's automated tax computation in some circumstances. The automatic tax rate established by Shopify may need to be changed, for instance, if specific items or locations have tax exemptions or exclusions.
Select The Taxation Method
You may control how taxes are calculated and displayed in your online business using this area. As seen below, it contains four checkboxes. You can activate them as necessary.
-
Add tax to the price.
-
Include or exclude VAT, depending on your customer’s location
-
Add VAT to delivery costs
-
Add VAT on digital products.
You may read Shopify's comprehensive Taxes guide for more details on this.
Establish Shopify Shipping
You may select from a variety of shipping setup options for your Shopify store based on your needs. We’ve shared them below.
Shopify Shipping
Connecting your business to Shopify's shipping carrier accounts is made easier with the aid of Shopify Shipping.
Shopify Shipping Advantages
-
Purchasing and printing shipping labels from the Shopify admin.
-
Receive cheap shipping labels.
-
On the checkout page, customers can view computed shipping charges rather than flat rates.
Do note that only a small number of qualifying fulfillment sites are eligible for Shopify shipping.
Third-Party Shipping Providers
You can turn on third-party carrier-calculated shipping if you want to link your business to your individual shipping carrier accounts. But you'll need to be on the Advanced or Shopify Plus subscription.
This functionality may be added to Shopify Basic plans and lower tier plans at a monthly cost or by moving from monthly to annual pricing.
Shipping Apps For Shopify
Utilizing a Shopify shipping app is another choice for efficiently managing shipments. These Shopify apps include a number of functions that can assist you in numerous ways, including the ability to generate shipping labels, provide shipping insurance, track items, as well as keep you informed with delivery updates, to name a few. You can browse and compare apps on the Shopify App Store.
To make your shipping policy appealing and simple, employ free shipping. Your customers will find your offers more enticing if you provide free delivery, and you won't need to bother about figuring out shipping rates either. Don't forget to alter your profit margin, though, since you might need to make sure that the price you set for your product or service includes delivery.
You can also use delivery date apps to give customers the flexibility to choose a shipping date of their choice. With the aid of Shopify delivery date apps, you can provide your customers the option to choose a delivery date for their orders on your cart page, and even your Shopify checkout page. By implementing delivery date customization, Shopify Basic and Shopify Plus merchants can customize their Shopify checkout page experience to improve customer satisfaction, lower cart abandonment rates, and streamline their shipping processes.
Learn how you can Customize Your Checkout With a Delivery Date App
Now that all of the above basic aspects are taken care of, let’s move on to testing your store.
Testing
Testing your Shopify store to make sure everything functions seamlessly is essential to ensuring a positive user experience. We would recommend focusing on testing the following aspects on high priority:
-
Order processing flow
-
Email notifications
-
Payment methods
-
Checkout process
-
Shopify apps added
How can you test your Shopify store?
Switch On Password Protection
The first thing you want to do is turn on password protection. If your store is already operational, you should enable password security when testing payments. Otherwise, a customer may try to make a purchase but will be unable to do so using their actual credit cards.
Go to Online Store > Preferences > Password Protection to enable password protection. After checking the box, press the Save button.

Disable Auto Order Fulfillment
Make sure that order fulfillment is disabled so that any test orders won't immediately enter the fulfillment process. This is especially important if you run on a dropshipping model with orders being completed by a print-on-demand or third-party supplier.
To do so, visit Shopify Admin > Settings > Checkout > Order Processing and choose the radio option saying "Don't fulfill any of the order's line items automatically".

Activate Test Mode To Place A Test Order
Test orders can be placed in a number of ways. Depending on your payment source, you must adhere to the testing technique.
If You're Using A Third-Party Payment Gateway
Certain third-party payment providers offer "test mode," which can be enabled within the Shopify admin. To conduct thorough testing and ensure seamless integration with your store, it is essential for third-party payment providers to have the "Enable test mode" option activated in their settings. For detailed instructions on utilizing test mode with a specific payment provider, we recommend referring to their comprehensive documentation.
If You’re Using Shopify Payments
You can test Shopify Payments only if you have chosen a paid plan. However, do note that the test mode is not supported for merchants in France.
To turn on test mode, follow these steps:
Go to Shopify admin > Settings > Payments > Click Manage in the Shopify Payments section > In the Test Mode section, select Enable Test Mode > Save.


To simplify the testing procedure, disable any accelerated checkout options on your payment provider page, such as Shop Pay, Apple Pay, or Google Pay.


To simulate a successful transaction, use the following information when you are asked for credit card details at checkout:
-
Name on card: Enter at least two words.
-
Expiry date: Enter any date in the future.
-
Security code: Enter any three digits.
-
Card number: Use any of the following numbers as shown in the image below

To simulate failed transactions or errors use these test credit card numbers:
-
Use credit card number 4000000000000002 to generate a card declined message.
-
Use credit card number 4242424242424241 to generate an incorrect number message.
-
Use credit card number 4000000000000259 to simulate a disputed transaction.
-
Use an invalid expiry month, for example, 13, to generate an invalid expiry month message.
-
Use an expiry year in the past to generate an invalid expiry year message.
-
Use a two-digit security code number to generate an invalid security code message.
Using The Shopify Bogus Gateway
Follow these steps to use Shopify Bogus Test Gateway to place test orders:
Go to Shopify admin, then Settings > Payments.
If you’ve previously activated a credit card payment provider, you’ll need to deactivate it before continuing by clicking on Manage > Deactivate, then confirm your deactivation.
If you have Shopify Payments activated:
From Shopify Payments, select Manage. Then scroll to the bottom of the page and click Switch to a third-party provider, then click on the option again to confirm.
Without Shopify Payments enabled:
From Shopify Payments, choose to see all other providers.
If Shopify Payments isn’t available where you are, go to the Payment Providers section and select Choose a Provider. From the list, choose Bogus Gateway. Select Activate (for testing) Bogus Gateway, then Save.
Now go to your online store to add products to your cart. Your test purchase should be more than $1 in any currency. Enter the following information at checkout:

Go to (for testing) Bogus Gateway and click Manage once you've completed testing.
To remove (for testing) Bogus Gateway from your checkout, choose Deactivate.
Run A Complete Flow Test
Open your website in an Incognito window after placing your payment provider to test mode, and then analyze everything from a customer’s perspective.
Examine the whole flow of a customer's purchasing process to check if everything is functioning as intended, from signing into your account to placing a test order and even the emails received after the sale is completed.
Now let’s move on to steps you can take to grow your store.
Get Ahead Of SEO Settings
Who doesn't want to attract organic traffic to their website once they launch their store? We all love free traffic! So, let's dive into the world of SEO.
View Our Ultimate SEO Checklist For 2023
Search Engine Optimization (SEO) is the practice of enhancing the visibility of your web pages on search engines such as Google and Bing. To ensure your Shopify store gets noticed, it's crucial to follow these recommended SEO practices:
Optimize Store Content
Everything that is written for customers to read on your Shopify store, such as product names, product descriptions, blog posts, etc., is considered to be part of your website content.
The relevancy of your website's content is extremely important for SEO when people search for anything on Google. As a result, you must make your material based on the search queries of your target audience.
Integrate Google Search Console

Among Google's various free and practical services is the Google Search Console. Examining and resolving issues with your website's visibility in Google search results is much easier with its assistance. In order to determine if Google can locate and crawl your website or not, Google Search Console provides you with tools and reports. Additionally, if you submit fresh content or update old content, you may ask for indexing or re-indexing.
Employ SEO Tools
Use SEO tools to your advantage. Numerous helpful SEO tools are available for free, including Google's Keyword Planner, Ubersuggest, AHRefs, and SEMRush, to name a few. Analyze the search phrases that your customers use to find your products or services. Look for terms that describe your items and brand. You can employ highly searched-for and sparsely competitive keywords. High-volume keywords are those that are often searched for, and low competition indicates that few websites are using those keywords.
Improve Your Store’s Speed
Website speed is a crucial factor for both user experience and SEO. To improve your Shopify store's speed, optimize your images by reducing file sizes, minimize code by eliminating unnecessary elements, enable browser caching, consider using a Content Delivery Network (CDN) to serve content from servers closer to your visitors, and ensure your website is mobile-optimized. A fast-loading website enhances user engagement, reduces bounce rates, and improves search engine rankings. Prioritize speed optimization to provide a seamless browsing experience and boost your store's visibility online.
Add More Pages
To add more pages to your Shopify store, head over to the Shopify Admin > Online Store > Pages > Add Pages.

You will then be sent to a page editor, where you can give your page a title and fill it with content. Additionally, you have the option of editing the search engine listing and selecting a template for the page that you are going to create.

Organize The Main And Footer Menus
From the Shopify admin, Select Online Store > Navigation. The header menu and footer menu should be visible on the navigation page.

Details like the terms of service and privacy policy are typically included under the footer menu.
On the other side, the main menu highlights the pages that are vital to developing a compelling brand experience. These can include, to name a few, your product pages, about us pages, and blog pages. To ensure simple navigation and a seamless shopping experience for your consumers, make the effort to strategically layout your menus.
Select the menu that best fits the newly generated page you just made, then click Add menu item.
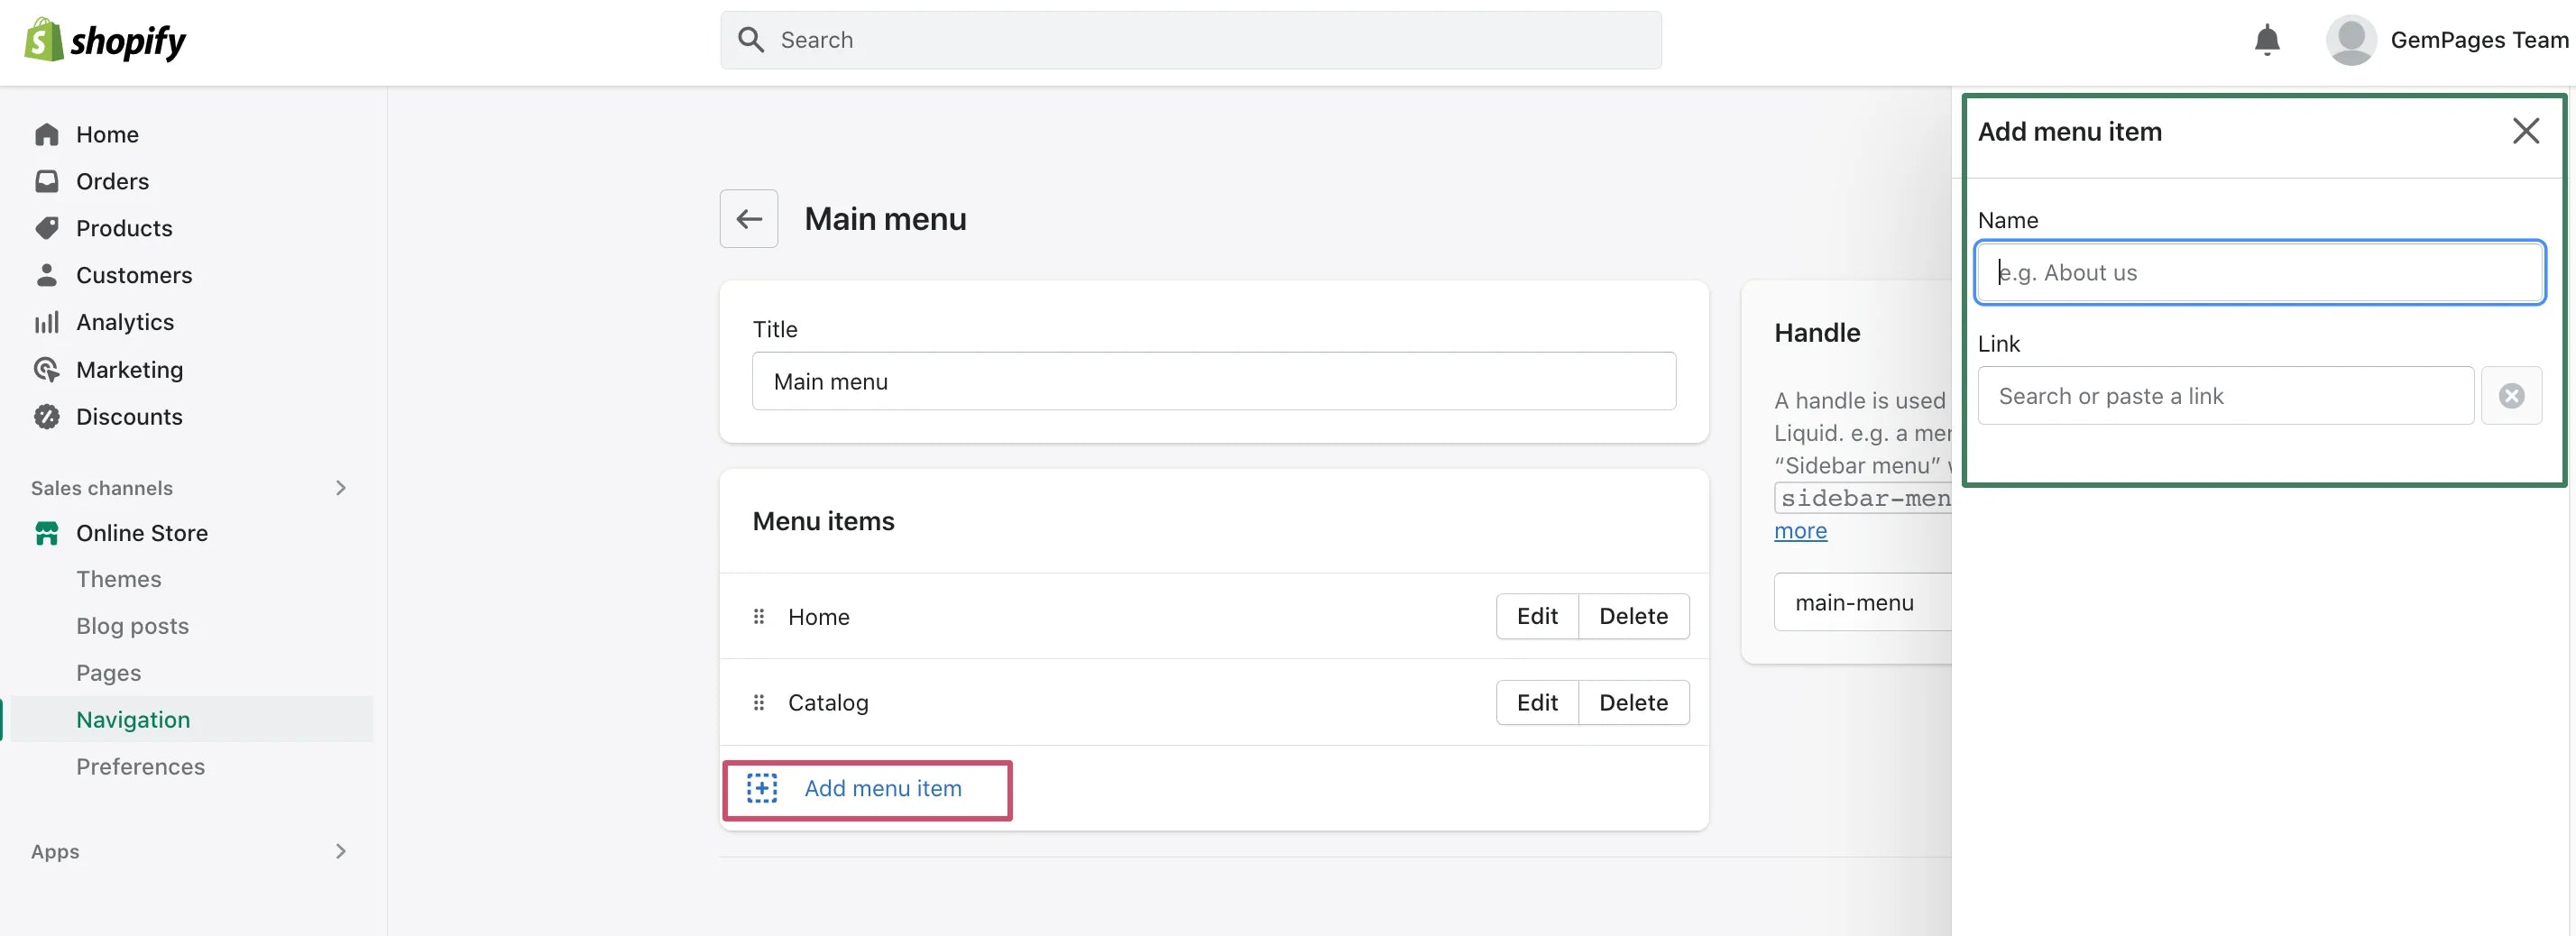
On the menu, the name is how your menu option will be visible. For instance, you may choose any term you like for the title of your About Us page, such as About Us, How We Started, Who We Are, etc. Under the Link bar, you can either type a link into this box or paste a link to the relevant landing page. Once you have entered everything, click save.
In order to create a unique customer experience, we suggest emphasizing your focus on the following pages:
Homepage
Creating a unique homepage is crucial for Shopify merchants or developers. The homepage serves as the virtual storefront and the first impression for visitors. By making the homepage unique, you can effectively showcase your brand identity, products, and value proposition. A distinctive homepage design helps to captivate and engage visitors, encouraging them to explore further and potentially make a purchase.
Additionally, a unique homepage sets you apart from competitors, demonstrating your commitment to providing a memorable and tailored user experience. Whether through captivating visuals, displaying your Instagram feed, compelling copy, or interactive elements, investing time and effort into making the homepage unique can significantly impact customer perception, conversions, and overall business success.
Learn How a Shoppable Instagram Feed Can Help You Leverage The Power of Social Media Marketing
About Us Page
Crafting a unique About Us page is essential for Shopify stores. According to a survey conducted among customers, 52% of respondents expressed their desire to see the About/Company information page once they land on the homepage. This statistic underscores the importance of paying attention to this specific page. The About Us page serves as an opportunity to tell your brand's story, showcase your values, and establish a personal connection with customers.
By making it unique, you can differentiate your business, build trust, and leave a lasting impression. Include compelling visuals and authentic narratives and highlight what sets your brand apart to engage customers and foster a sense of familiarity. A well-crafted About Us page can significantly contribute to customer engagement, conversions, and overall brand loyalty.
Product Page
Focusing on creating a unique product page is another essential consideration. The product page serves as the primary interface between customers and the products you offer. By making the product page unique, you can effectively showcase the features, benefits, and value of your products in a compelling and engaging manner. Customizing the product page allows you to highlight product images, provide detailed descriptions, and incorporate persuasive elements such as customer reviews, ratings, and related products.
Additionally, optimizing the product page for mobile responsiveness and intuitive navigation ensures a seamless browsing experience across different devices. A well-designed and unique product page not only captures the attention of potential customers but also enhances their understanding and desire to make a purchase. Investing time and effort in creating a distinctive product page can significantly impact customer engagement, conversions, and overall business success.
Checkout Page
The creation of a distinctive checkout page must be a top priority for Shopify merchants or developers. The checkout page is the last stop in the customer's purchase process, and the functionality and appearance of this page may have a big influence on conversion rates. You can provide customers with a smooth, personalized experience on the checkout page, which will boost their trust and confidence in their purchase.
The whole buying experience is improved when the checkout page is tailored to match the branding and aesthetics of your company. Additionally, simplified forms, clear instructions, and intuitive navigation help streamline the checkout procedure and reduce cart abandonment. A distinctive checkout page can include personalized product recommendations to improve the user experience while also boosting the chance of profitable transactions.
Learn How To Customize Shopify Checkout Step By Step
Thank You Page
Developing a unique thank you page is another vital consideration. The thank you page serves as a valuable opportunity to express gratitude to customers for their purchase and create a lasting impression. By customizing the thank you page, you can enhance the post-purchase experience and reinforce brand engagement. Consider incorporating personalized messages or product recommendations, exclusive offers or discounts, and social sharing options to encourage customers to spread the word about their positive experiences.
Furthermore, utilizing the thank you page to provide relevant information such as order details, estimated delivery dates, and customer support contact information can instill confidence and reduce post-purchase anxiety. A well-crafted thank you page not only shows appreciation but also reinforces the customer's decision to choose your brand and encourages repeat purchases and referrals.
Now let’s move to the official side of things.
Establish Store Policies
Your store's policies safeguard your company and provide customers with transparency.
Prior to making a purchase, 66% of customers check a company's return policy. Customers claim that 48% of them have ceased doing business with a firm or stopped utilizing a service because of privacy concerns.
These results highlight the need to maintain strict policies.
Which store policies you should prepare and why are shared below:
Refund Policies
Customers frequently worry about what can go wrong while purchasing online. How would they spend the money if it happened? You may instill trust in your customers to make purchases from your company by outlining a transparent and equitable refund policy.
Returns Policies
It is essential to be clear in your returns policy whether you have a 30-day return policy or don't accept returns because of the nature of your items so that your customers have the clarity they require.
Privacy Policy
Typically, your privacy policy may contain details on how you gather personal customer information and how it is used and shared inside and outside of your company. It could also need to include crucial parts on cookie policy, behavioral advertising, and other topics.
Terms Of Service
A legal document known as a "terms of service" lets you define all the terms and conditions that apply to you (as a business owner, service provider, or firm) and your customers.
Shipping Policy
Customers want transparency regarding when their orders will arrive after they have made an online purchase. To reduce customer queries and concerns about the fulfillment of their orders, you must set policies that define clear expectations about the shipping methods and timings.
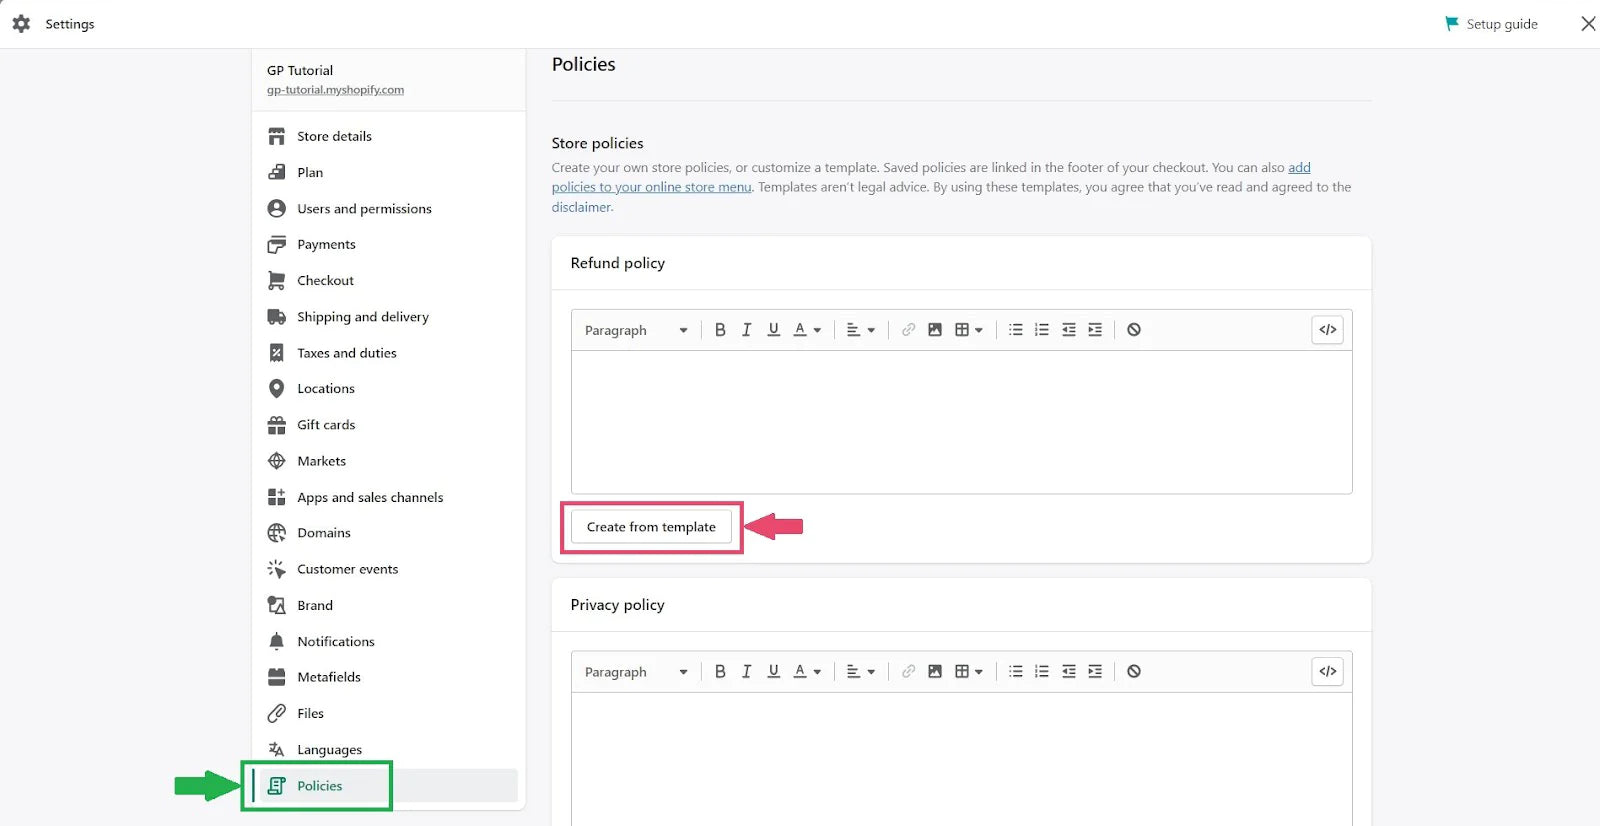
Generate Shopify Policy Templates
To help you in this regard, Shopify provides policy templates you can use. All you have to do is follow the steps below:
Go to Shopify Admin and click on Settings > Policies.
For various policy types, you'll find several template sections. Simply choose Create from Template under the policy section.
Do remember that Shopify offers just basic policy templates that may cover the majority of the elements that companies may need to include in their policies.
Shopify advises you to carefully examine all of the automatically produced material, though, and to edit, remove, and/or add any terms or details that are necessary for your Shopify store.

It is advised to obtain legal counsel from experts when drafting new policies for your business since they have legal implications.
Set Up Google Analytics 4
To track user interactions on your Shopify store, you can utilize the free data platform called Google Analytics 4 (GA4). GA4 has replaced the previous Universal Analytics, introduced in 2014, and offers several advantages over its predecessor. These include improved data collection, enhanced event monitoring accuracy, and the integration of machine learning capabilities.
To set up GA4 on your Shopify store, follow these steps:
Create a GA4 Property
Within the Admin section of your Google Analytics account, establish a new GA4 property if you don't already have one. Copy the tracking code from Web Stream Details.

Install The Tracking Code For Google Analytics
Within the Shopify Admin section, go to Online Store > Preferences. Under the Google Analytics heading, there should be an option to "Add Google Analytics code", click on it. The "Tracking ID" column should now appear. Paste your GA4 property ID in that column and click save.

Activate E-Commerce Tracking
To do so, open your GA4 property, select Data > Ecommerce Settings, and turn on enable e-commerce.
Activate Enhanced E-Commerce
You can monitor how customers behave on your product pages and during the checkout process with enhanced e-commerce. To activate it, navigate to Data > E-Commerce Settings and turn on Enable Enhanced E-Commerce Reporting. In order to add the required code to your Shopify theme, proceed as directed in the Enhanced E-commerce Tracking Guide.
Monitor And Analyze Your Data On Google Analytics
After completing the previously mentioned procedures, you can now begin viewing e-commerce data related to your Shopify store, in your GA4 property. To accomplish this, go to Conversions > Ecommerce > Overview.
Now that every necessary pre-launch step has been taken care of, you can launch your store!
Launch Away
Even though it's wise to consider all aspects at the start of your Shopify journey, don't strive for perfection right away. There are some steps you must finish before launching your store, and there are some that you may continue working on even after you launch.
However, do remember to remove your password before you launch!
Now begins the continuous task of marketing your store to your target audience. People will only buy what they know exists.
In the digital landscape, there are two techniques for marketing your store, which include:
-
Organic
-
Paid
Organic marketing is a form of marketing that comprises several unpaid methods to encourage customers to visit your store. The means of organic marketing that we suggest you focus on comprise:
-
Content Marketing
-
Social Media Marketing
-
Email Marketing
-
Search Engine Optimization
Paid marketing involves setting and distributing a marketing budget for advertising options provided by the various online platforms that your potential customers are on. The platforms that we suggest focusing on include:
-
Google Ads
-
Facebook Ads
-
Influencer Marketing
Scaling your Shopify store is an ongoing process that requires you to plan, implement, and optimize your strategies with each step. With our blog, you have a solid foundation for how you can develop, customize, and grow your Shopify store. However, if you do need professional expertise, feel free to reach out to the SANOMADS team of Shopify Experts below.
Book Free Consultation


